Sunday, November 30, 2014

Picture Frame Door


Much to my husband's dismay, I have a habit of finding "stuff" in the alley or on the curb that others have set out for trash.  Anytime I bring something home (or request for him to go pick something up), there is a minor amount of grumbling... which I understand because who really wants someone else's "junk" sitting in their garage?  I think we've come to an agreement though:  he will support my urges to "dumpster dive" and I will flip whatever we found as fast as possible.

This is how I got my latest project - a glass paned door turned into a picture frame and wall hooks! 

Last week I was perusing Facebook and Pinterest, where I saw someone had posted/pinned a door that had been turned into a picture frame and wall hooks.  

Awesome way to reuse an old door. Unique picture frame. #DIY 

I was intrigued, but didn't really have a door to use, nor was I going to purchase one.  Then, coming down my alley on the way home I saw it!  Someone was throwing out a door!  I got out to make sure it was all in one piece.  It was!  I got home and immediately asked the husband to go down the alley to get the door.  (Which he did because he loves me!  Thanks, honey!)

SUPPLIES:
Window-paned door
Hooks (got mine at The Home Depot)
Antiquing Glaze (I use a water-based Valspar from Lowe's)
Polycrylic clear coat (also water-based)
Paint brushes ( I used a 2 1/2" and a 1" brush)
Rags (you will need a few)
Bowl of Water
Window cleaner and paper towels
Tape Measure
Drill
Up to 15 Pictures (horizontal, sized and cut down to fit the windows) 
Tape 
Ribbon


I started by setting up the door in the garage and wiping it down with a damp rag.  I went ahead and did both sides and cleaned the glass on the backside so I didn't have to worry about it later.  I also had the husband cut it down, since typically the bottom part of the door is wider than the top.  Now it's evenly spaced!


Then I got my glaze ready.  The large stainless steel bowl has warm water in it.  I used the smaller green bowl to pour my glaze into for wiping.  A little goes a long way, so I just pour in a little at a time until it's all gone and then add more.  I hate wasting paint, so this works well for me.


I then took a clean rag, got it damp in the water and then dipped it in the glaze.  Then you just rub.  Get it everywhere! I learned to glaze from my friend Rachel (proprietor of Retro Rach!)  She is a master at antiquing furniture and I love everything she does (including the dresser in my daughter's room)!  Her key is the messier the better.  You want to make sure you get glaze in all the cracks and corners.  DON'T WORRY ABOUT BEING NEAT!  Seriously, the messier the better!


I let my glaze dry a little bit and then I took a clean rag, got it a little damp in the water, and then wiped/rubbed away.  The more you rub, the less glaze there will be, so you can decide.  If you get a little heavy handed in the rubbing, get your other rag back out and rub on a little more glaze. 


 Then you need to let it sit for a couple of days to cure.


After a couple of days I  got out my Polycrylic.  My favorite is Minwax clear satin (from Sherwinn Williams).  There are other less expensive brands you can get - this is just what we have at our house.  I started with my wide brush and coated around all the sides and the outside edges.  After that I took my thin brush and coated all interior parts of the door.  You don't want to get a lot of clear coat on the windows, so go light.  You can always add more, but you don't want it to pool on the window.  Then let it dry for about a day!

Next step:  Hooks.  These were the only things I had to buy for this project ($2.98 each!).  


I started by measuring center first.  Then in from the two sides, then centered the last two hooks between those.  Mark everything with a pencil first!  Make sure you have it where you want it and then you can take your drill and attach the hooks. 


Looking at the door I knew I needed to do something about the door nob/deadbolt holes.  I love my burlap ribbon (from Hobby Lobby).  I just used some scrap I had to tie a beautiful bow through the holes.


The last thing is to place your pictures.  Since I plan on consigning the door, I didn't want to put personal picture.  I had an old calendar, so I cut down the pictures to fit in the windows (you will need to measure your windows and cut down your pictures or center them accordingly).  I used plain scotch tape to hold the pictures in place.


Sunday, May 11, 2014

Cinder Block Herb Garden


We moved last year and one of the things I miss most about our old house (besides our wonderful neighbors) is our herb garden.  One of the first exterior improvements we did at the old house was fill the 16 foot flower bed in the backyard with rosemary, sage, chives, peppers, basil, cilantro... it was so perfect!  I love our new house, but definitely miss the fresh herbs.

Things were hectic when we moved in last year, so we didn't really get around to doing any yard improvements, let alone landscape a garden.  You see, our new house only had one small triangular-shaped bed in backyard and it is much too small for an herb garden.    

To solve this problem I started looking on Pinterest on what ideas I could find.  Scott and I had a plan for the backyard, but we aren't even close to being able to start that giant project.  At first I thought of doing a "palette garden" which could start horizontal, but then be turned vertical once things rooted well.  I even went as far as driving behind Target to check if they had any extra palettes laying out.  (Scott was not thrilled.)


When we got to Home Depot to buy plants, Scott asked about just making a flower bed.  I said I wasn't against the idea, but we would have to move the whole thing when we decided to landscape the yard, move the fence, put in a storage shed, and grow real produce.  The conversation did remind me of a pin I did for an above ground bed that involved cinder blocks.  I showed the pin to Scott, who loved the idea. 

A CINDER BLOCK HERB GARDEN

"Ingredients"
  •  Cinder blocks - we used 10 and they were about $2.00 each at Home Depot
  • Garden soil - I think we went through 6-7 bags
  • Garden cloth - to keep weeds from coming up
  • Your choice of herbs - if you use 10 cinder blocks you will have 20 small "pots" to fill and the middle area.
    For the small "pots"we went with:
    1- Parsley, 3 - Lavender, 3 - Cilantro, 2 - Basil, 2 - Thyme, 2 - Oregano,
    2 - Chives, 2 - Sage, 2 - Dill
    For the middle area we planted:
    2 - Rosemary, 2 - Jalapeno Peppers, 2 - Habanero Peppers

First know your plants and what kind of light they need.  You can research it, ask someone in the garden center, read the little stakes that come with the plant, but my favorite is to just ask my wonderful mother-in-law, Linda.  She is a plant genius.  Anything I can put on the brink of death, she can bring back!  We chose a part of our backyard on the north side close to our fence.  


This was a great location, but not the most level ground.  We started by laying out the blocks where wanted them.  Then Scott used a flat shovel to "trace" the area.  He then dug away a the top layer until it was more level.  If your yard is already level you won't have to do this.  


We then put down the weed cloth and put the cinder blocks down on top.


Now for the easy part!  Scott started mowing the yard while I went to work planting the herbs.  To make things simple, we went ahead and dumped all the soil into the center of the bed - then I could transfer it over to the small "pots".  I also placed the herbs where I wanted them. 


It didn't take long to plant everything it it's new home.  We love... LOVE rosemary!  I want another rosemary bush just like we had at our first house so I placed two rosemary plants in the center part, along with Scott's jalapeno and habanero pepper plants.  


For now I left the little plastic labels in, but I'm hoping to make some cute and colorful labels using paint sticks... but that's another post for another day!


Sunday, February 23, 2014

What to make? What to bake?

I discovered something while planning for Christmas gifts this past year, but a friend of mine reminded me this past week.  First, a little back story...


This was Scott and my 11th Christmas together.  For the past 11 Christmases I have done a majority of the Christmas shopping/making/gift planning.  Some of you know exactly what I'm talking about... and since my first real job as as a gift wrapper at JC Penney, I also wrap a majority of the gifts - usually all except mine.  Scott is actually a pretty good gift wrapper, for the record.  

This year I had some issues planning for my sister-in-law, Jessica.  She's really not difficult to shop for, but I know we've given her a few scarves, jackets and other clothing over the years.  I wanted something more original.  Maybe something for their new house?  I didn't know what to do and had major creative block trying to think of something.  

ENTER PINTEREST - to save the day once again!

I was surfing on Pinterest and saw some really cute stuff Jessica pinned.  Then it dawned on me - I don't have to ask for a list or suggestions from her; I can just check her pins for something she would like!!  It was genius!  (I know this isn't something new and many of you have done it, but I felt awesome thinking of it!)  

Jessica pinned a beautiful jewelry board (similar to this, but not the same.)


I knew I had to find/make/buy something.  I headed to Hobby Lobby and started filling my basket with a frame and ribbons... then I roamed down an isle and found one!  Perfect!!  

With the crazy last few months I have had it doesn't surprise me I forgot about this.  That was until a friend of mine offered to make us dinner while I was out on medical leave.  She was trying to think of something to make for us and ended up surfing my Pinterest page for the answer.  (Thank you, Amy Brown, for the delicious cream cheese chicken enchiladas!)

So, the moral of the story:  When you're looking to make something for someone, bake something for someone, or just hit a creative block on what to get them... check out their Pinterest page!


Tuesday, February 11, 2014

Picture Frame Wreath


What you will need:   
24-2x3" frames
24 of your favorite photos
18" grapevine wreath
floral wire, ribbon (if you want)


When I first joined Pinterest I pinned a beautiful wreath made of picture frames, hoping one day I would be able to make it for my mother-in-law, Linda. This Christmas I decided that would be the perfect gift for her.  I started by asking her to pick about 20 of her favorite pictures - group, singles, old, new... pretty much whatever she wanted (which caused some problem on her part because she wanted more direction than I was willing to give).  I already had a few photos I wanted to include, hence only 20 and not 24.

While Linda perused through years of photos looking for her favorites I set off looking for small pictures frames.  I decided I needed about 24-2" frames of different shapes and designs.  I did know I wanted to stick with "silver" for the color scheme.  I hit up Hobby Lobby first... they have a great selection of small frames but they were really expensive, even with the 50% off, when I would be buying over 20.  After that I strolled over to The Dollar Tree where I hit the jackpot!  I bought pretty much everything they had, as well as a few that really caught my eye at Hobby Lobby.  

Once Linda gave me the photos she loved, I scanned them into my computer and used Picasa (a free program) to crop them all down to 2x3 and adjust them all to black and white (my preference). Then I printed them all on regular paper (you could use photo paper if you wanted, but I did not find a need to since I have a nice printer).  Then I used a cutting board to cut them all out.  Then they are ready to go in the frames.  I laid all mine out to make sure I had everything like I wanted it!


After putting all the pictures in frames I did have to prep the frames.  The "arm" on the back of the frame used to make it stand had to go.  I was able to do this to most, but my "good deal" frames from The Dollar Tree needed their stands hot glued down.  Basically you are making something to weave the wire through.


Floral wire laced under the stand on the back of the frame - stand has been hot glued down.
 When all your frames are ready you can begin placing them on your wreath.   I loved the way this worked on the grapevine wreath!  There were a lot of place to weave and twist the floral wire to when attaching the frames.


The hardest part was making sure there weren't too many pictures that were similar (the same people, even or layout - landscape/portrait) in the same place. I did have to move some around after adding more.


 As you can see, my style leans more towards an overlapping, eclectic mix.  I didn't really want the wreath to show through too much and I wanted as many pictures on as possible.  Some had to be twisted to just the right angle so the photo next to/behind/etc. could still be seen. 


 Once I finished attaching and adjust all the frames just right, I attached a burlap and lace ribbon to add a little something extra.  I thought the final product was perfect.  I'm sure I'll make another one of these soon... for me! :)


Monday, December 2, 2013

A Wreath for Gwen

Pinterest strikes again!  

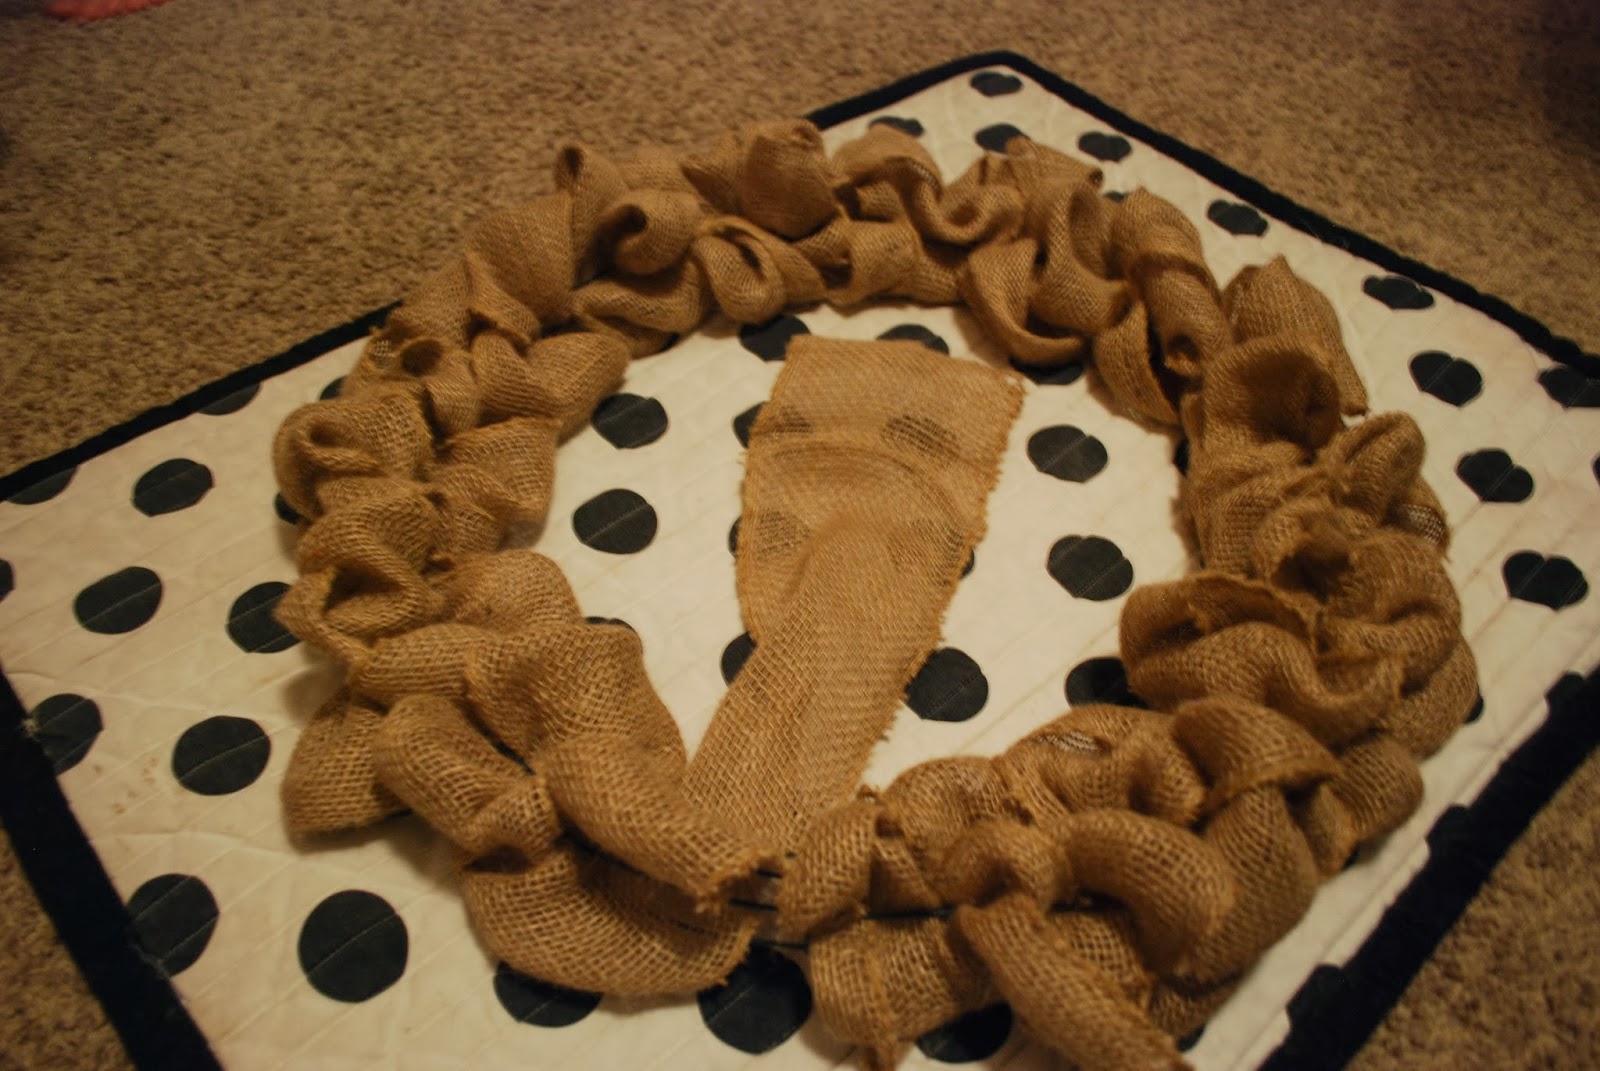
During the summer I found some super cute wreaths on Pinterest AND some DIY instructions!  This made me super excited, but I was also nervous.  The burlap wreath I wanted to make didn't start with a base of greenery or required hot glue.  My first attempt required a lot of floral wire to attached the burlap ribbon to the wire wreath frame.  This wreath is actually my 6th wreath to make and I tried a different method.  I really, REALLY liked this way better (no cutting or twist wire to attached the burlap!)!

For this wreath you will need 2 - 15' rolls of burlap ribbon (I use 6"), and 18" wire wreath frame and whatever embellishments you plan on using (I had a wooden letter S, some silk flowers and some pieces of burlap ribbon I had left over from past wreaths).  


What makes this so easy is you are just weaving the ribbon between the wires on the wreath.  I repeated three times for each section of the wreath, fluffing and pulling it to look puffy as I went.


It didn't always lay straight as I I wove it through and I had to remember to loop back when I got to the end.  One roll of 15' ribbon should do half the wreath.  


When you get to the end of the ribbon, weave/wrap it back through. The end piece won't be noticeable with all the other ruffles.


Once I finished the base burlap I used some scraps from previous projects. 


I did not have enough to fill around the whole wreath so I cut some pieces to tuck in around the wreath to create the look that it went all the way around.


Now time for some personalization!  My friend, Gwen - who might just be one of the most wonderful people in the world - has a last name that starts with an S.  I used the some floral wire to wrap and twist around the S.


Then I pushed through the burlap to twist the the wire wreath.  I also used some silk flowers with wire stems to follow the same method.  And here is the final product!


You could always use colored flowers or paint the letter to add some color if you aren't into the neutral/black & white theme.  All-in-all this took about 15-20 minutes to complete.  


Happy birthday, Gwen!


Friday, November 29, 2013

O, Christmas Tree!

We have a new house (which I love), but it's a new kind of Christmas shock when I had to change up my decorating scheme.  Our former home had all manner of shelves and ledges and after seven year I had decorating down to a science... I even took picture so I could make sure it was similar year-to-year.  The new house is wonderful, even without the ledges, but it has it's challenges.  

Challenge 1:  Where to put the tree?  Let me rephrase... where to put the treeS? 
Several years ago, Scott accidentally allowed me to get two 5' porch trees to decorate inside.  The first was easy - in our bedroom like always - but the other (the Aggie - Elephant tree) needed a home, as well as our traditional tree.  After much discussion, the big tree will reside in our front office/"library" and the Aggie tree will light up the dining room.

Challenge 2:  After assembling the big tree in the front room I realized it was the ONLY Christmas decoration in the office.  Scott built me two beautiful 7' bookshelves for my birthday, but I didn't have any decoration for them.  Personally I like to buy my Christmas decorations after Christmas to get the clearance prices, but I'm also impatient and this year I didn't want to wait.  I also have a Holiday board on Pinterest and found this:

12 Days of DIY Christmas Trees {Diamonds and Burlap}

I also found some similar trees at Target and Hobby Lobby... for $20+ each, which isn't going to work on my budget since I would like 3-5 of these...
After looking over her tutorial I went to price supplies at JoAnn Fabrics and Hobby Lobby.  I'm not sure where she got the spectacular, bedazzled ruffles, but it wasn't at JoAnn's or Hobby Lobby.  I did find Styrofoam cones (at 30% off!), 15 foot roll of burlap ribbon, and floral pins.  

 Styrofoam cone, 6" burlap ribbon, and floral pins

If you get 6" ribbon you're going to want to cut it half down the middle to make two long pieces.  You can either cut slowly and carefully OR find the middle string and snip the end then pull it through to give yourself a clear path to cut. 

  Burlap ribbon cut in half

Start and the bottom of the cone and create pleats by folding the ribbon back and pinning it in place (on the pleat) with a floral pin.  Keep working your way up the cone by wrapping and pleating.


  Try to put a pin on each pleat to hold it in place.  Floral pins work best because they are U-shaped and can hold the burlap well.

Keep working your way up the cone by wrapping and pleating.  At some point you will come to the end of the first piece of ribbon.  Make sure you pin it well and then overlap the second piece of ribbon with a pleat to hide the ends.


  It took almost the whole two pieces of 15' ribbon to pleat-wrap the whole cone.


At the top you will need to cut off the ribbon, but leave a few extra inches to fold and wrap and pin in place so you don't have frayed burlap hanging out.


The top of this cone is flat, which worked out nice for pinning the end in place. 

You can also put any finishing touches on.  I had this plastic star ornament as part of our entertainment center decorations. I used two floral pins to put it on top of the tree.


  Sine the tree is very light-weight, try not to use anything too heavy on top of the tree.

And here is the final product.  Currently it's on my mantle, out of reach from curious children and playful pets, but as soon as I finish the other and get the top of the bookshelves cleared it will take it's permanent holiday placement in the office!


I also like how the burlap hides the white cone So I didn't have to paint anything!

Overall, this only took me about 10 minute to do, no hot glue, no sewing, and no paint!
 

What to do with the leftovers?


We returned home from a nice time out gathering supplies for some upcoming projects (to be posted later) and decided dinner was next up for this evening's events.  

I'm sure the rest of you share the same feelings when it comes to the leftovers from yesterday's Thanksgiving feast... more turkey, potatoes, cranberry sauce, etc. reheated in the microwave.  Well, I'm not that fond of leftovers, so this afternoon I spent some quality time perusing Pinterest looking for something to spice things up.  I found just the thing!


Only I had to make some modifications...
INGREDIENTS:
  • 2 lbs of any squash,cut into pieces - I used acorn squash because that's what I had from Thanksgiving (mine was baked with butter, brown sugar, honey, salt, and cinnamon)
  • 3 cloves of garlic - minced
  • 2 thumb size pieces of ginger, sliced
  • zest from 1 orange
  • 2 1/2 tablespoons of extra virgin olive oil
  • 2 tablespoons of butter
  • Sea salt
  • Freshly ground black pepper
  • Cinnamon
  • Cayenne pepper
  • Your favorite herbs - I used crushed bay leaves and thyme (and would have used sage if I had it)
  • 1 tablespoon lemon juice
  •  Honey
 DIRECTIONS:
In a large pot place 1 tablespoon of butter, garlic, ginger, orange zest, and EVOO.  Let simmer on low heat (you don't want it to burn).
While that is simmering (and making your whole house smell delicious!), cut up your squash into cubes/smaller, cookable piece.  When your done cutting up the squash add it to the pot.  Pour in enough water to cover the ingredients and adjust your heat up to high.  While that cooks add a dash of sea salt, black pepper, cinnamon, cayenne pepper, crushed bay leaves, and thyme.  (I say "dash" because I don't usually measure, but if I did I would say it would be about 1/4 to 1/2 a teaspoon of each, EXCEPT THE CAYENNE which really is just a dash.) Let cook (it will boil) for about 15 minutes, stirring so the bottom doesn't burn.  You'll know it's done because your squash will be soft and your whole house will smell amazing.  You will also hear your family asking when dinner will be ready.
Carefully (CAREFULLY!!!) pour your mixture into a blender and puree' until smooth.  Add in some more salt and black pepper (as much as you like), the lemon juice, and a spoonful of honey and blend some more.
Pour into bowls and serve with a little sprinkling of grated Parmesan cheese. Makes about 2-4 serving depending on your serving size.  

Scott (my very handsome husband), didn't really eat the acorn squash from Thanksgiving dinner, but was all about this "leftover" soup.  I hope you enjoy!  

(Sorry, no pictures of the actual soup.  I didn't think about doing this until we were cleaning out the bowls.  I'll do better next time.)